davylloyd 0 Posted August 9, 2012 This afternoon, I had a much better session working on the first project watch, and have now pretty much completed it. The first two stages have been detailed in my other threads, and for those of you who have been kind enough to read them, please read on to see how it turned out. Share this post Link to post Share on other sites
davylloyd 0 Posted August 9, 2012 I had a real nightmare when I first tried to drill out the lug holes, but after seeking some advice from my good friend Tony, a mechanical engineer, I followed his advice and bought a diamond - tipped drill bit, here fitted to my replica dremel Share this post Link to post Share on other sites
davylloyd 0 Posted August 9, 2012 .....and also his suggestion to use a solid type cutting lube.... Share this post Link to post Share on other sites
davylloyd 0 Posted August 9, 2012 The whole purpose of this drilling is, of course, to fit the right type of spring bars. Share this post Link to post Share on other sites
davylloyd 0 Posted August 9, 2012 Set the ahem Dremel on slow speed and feel your way through the existing lug holes, having first dipped the drill bit in the lube. Stop a couple of times and dip again, and without any excessive force, in 30 secs. or so, you're through. Finished result looks like this.... Share this post Link to post Share on other sites
davylloyd 0 Posted August 9, 2012 Then fit the new spring pins. That's better! Share this post Link to post Share on other sites
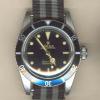
davylloyd 0 Posted August 9, 2012 (edited) Can't resist a sneak preview. Here you can see the results of my efforts with sandpaper and bleach on the bezel insert, having first stripped off the paint I wasted my time with.... Edited August 9, 2012 by davylloyd Share this post Link to post Share on other sites
ron76 0 Posted August 9, 2012 Maybe you can remove the pearl, stick some tape next to the triangle and get rid of the red triangle with some sandpaper ? Share this post Link to post Share on other sites
davylloyd 0 Posted August 9, 2012 ...but what time is it? Share this post Link to post Share on other sites
davylloyd 0 Posted August 9, 2012 Here's what I did to the case, nothing so brutal as shaking it up in box of stones and screws, just gentle work with wet and dry and files to try to get a 50 year old patina. Share this post Link to post Share on other sites
davylloyd 0 Posted August 9, 2012 ....and likewise with the back. Share this post Link to post Share on other sites
davylloyd 0 Posted August 9, 2012 Here was how the dial wound up after my best efforts at recreating vintage Tritium lume. Share this post Link to post Share on other sites
davylloyd 0 Posted August 9, 2012 Here is the spacer ring that goes between the dial and the movement. ....and then fitted back on the back side of the dial..... Share this post Link to post Share on other sites
davylloyd 0 Posted August 9, 2012 And after loosening the dial mount screws, re-fitting the dial, and re-tightening the screws. Share this post Link to post Share on other sites
davylloyd 0 Posted August 9, 2012 Then assemble what I'll need to refit the hands. Cocktail stick with the trusty blu-tack, hand pressing tool, and some fine tweezers. Share this post Link to post Share on other sites
davylloyd 0 Posted August 9, 2012 Continuing my policy of being a cheapskate, I use this for refitting crystals. £1 a tube in Wilko's, cures under UV. (sunlight or my UV torch) Share this post Link to post Share on other sites
davylloyd 0 Posted August 9, 2012 I always wash a crystal or plexi in soap and water before fitting, then dry with a lint-free cloth. Share this post Link to post Share on other sites
davylloyd 0 Posted August 9, 2012 ....then after removing the stem once more, re-case the movement, refit the brass spacer ring, and refit the stem and crown. Share this post Link to post Share on other sites
davylloyd 0 Posted August 9, 2012 I expected a real hissy fit replacing these tabs and screws, in the event it was all done in a couple of minutes. Share this post Link to post Share on other sites
dalboy 2 Posted August 9, 2012 More please !! ohh come on dont stop there.. Love everything so far with exception of the luming !! blimey o'reilly !! the lume on 9 and 12..ummmm. As for the ageing of the case ..YES !! thats what i mean , subtle ..less is more...good work.. more pics please .. Dal.......... Share this post Link to post Share on other sites
davylloyd 0 Posted August 9, 2012 Then off with the caseback seal for some grease. Remind myself that this is not a diver's watch, just something that hopefully looks a little bit like one.....still, it would be nice if it was mildly water resistant. Share this post Link to post Share on other sites
davylloyd 0 Posted August 9, 2012 More please !! ohh come on dont stop there.. Love everything so far with exception of the luming !! blimey o'reilly !! the lume on 9 and 12..ummmm. As for the ageing of the case ..YES !! thats what i mean , subtle ..less is more...good work.. more pics please .. Dal.......... Yes, not too good, but it is my first stab at it, and I'll learn, I hope...... Share this post Link to post Share on other sites
davylloyd 0 Posted August 9, 2012 Use silicone grease, NOT VASELINE! Just a thin smear. Must stop now for some food, back shortly....... Share this post Link to post Share on other sites