10:10 Watch Repair 1 Posted December 28, 2009 Here's some info on a long lost technique: The following materials are needed to fill engraved dials. Sealing wax is the preferred filling material, despite occasional references to "enamel." Sealing wax is made and available from large office supply houses, and it is sold as filling material for use by cabinetmakers. It is a mixture of hard wax and shellac. A rubber squeegee such as used for the application of "body filler" (Bondo) can be obtained from automotive suppliers for pushing melted wax into the engraving. An electro-typer's 2" by 3" rubber block is used to grind and level the wax. In addition, a source of localized heat is needed such as a Bunsen burner, a propane torch, or a similar source of controlled flame. A gas ring, or electric stove burner is not suitable. Flour of pumice sometimes found in hardware stores and available from dental supply houses will be needed to level the wax after the engraving is filled. Normally, unless damage to the wax used to fill engraving is minimal, it is best to remove the old wax, then refill the entire dial. Old wax becomes brittle, and wax which has cracking and is falling out of the engraving can rarely be made to flow evenly when heated to try to rejuvenate it. The oils in old wax harden, and the wax shrinks so that it needs to be supplemented, if not replaced. The effect of mixing old and new is uneven and unattractive in appearance. To remove old wax, it is best dissolved out of the engraving at the same time the old lacquer or shellac used to seal a silvered or brass dial is removed. Most water-based cleaning solutions will accomplish both jobs, especially if the dial is first wiped with a paper towel moistened thoroughly with acetone. A soak in detergent will work too, but there is a risk of pitting the brass dial if it is left in detergent too long. Real soap, such as Ivory flakes, will work more safely. Once the old wax has softened sufficiently, it can be flushed away with hot water and a bristle brush of moderate stiffness. A tooth brush works well. New wax needs to be melted into the engraving. Begin by heating one numeral and the surrounding engraving with application of heat behind the area to be filled. Lightly rub the stick of sealing wax around the engraving, being careful that the heat is sufficient to melt the wax to liquid, but not enough to make the melted wax boil. As soon as the area being heated is filled, scrape the excess melted wax toward the next numeral using the "body" squeegee. Transfer the heat to the area where the wax is being pushed, and add more wax if needed to fill the new area. Repeat this process until all the engraved areas are filled. The squeegee process often involves moving the squeegee in different directions to assure wax is pushed into all the engraving at the same time surplus is removed from the surface of the dial. The most common method of "leveling" the wax is to gradually and gently abrade it with a slurry of pumice and water-rubbed with the elecro-typer's rubber block. A piece of soft wood can be substituted if necessary. The surface will have a neutral appearance under most circumstances. Share this post Link to post Share on other sites
trailboss99 994 Posted December 28, 2009 Intersting. How's the engraving going mate? Col. Share this post Link to post Share on other sites
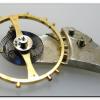
10:10 Watch Repair 1 Posted December 28, 2009 Intersting.How's the engraving going mate? Col. The engraving is perfect, the computer (or operator) is not. I am at the point where I can program any text to print, the toolpath comes up in the CNC, but the machine control is off (there's lots of technical details I could go into.) If I didn't keep breaking or dulling cutters, it would be a bit quicker. BTW, the goal is do start 3d milling parts in addition to engraving. I made the 1:1 CAD for vintage bridges for Molnija movements. Share this post Link to post Share on other sites
sconehead 5 Posted December 28, 2009 Good info on how to do the wax thing, I fancy going down this route rather than using resin. Regarding the Molnija bridges, you just doing the Nighthawk thing or making them from scratch? 618 style perhaps... Share this post Link to post Share on other sites
10:10 Watch Repair 1 Posted December 29, 2009 Good info on how to do the wax thing, I fancy going down this route rather than using resin. Regarding the Molnija bridges, you just doing the Nighthawk thing or making them from scratch? 618 style perhaps... From scratch, 618. Share this post Link to post Share on other sites
sconehead 5 Posted December 29, 2009 Good info on how to do the wax thing, I fancy going down this route rather than using resin. Regarding the Molnija bridges, you just doing the Nighthawk thing or making them from scratch? 618 style perhaps... From scratch, 618. Great stuff, any idea on prices? Share this post Link to post Share on other sites
10:10 Watch Repair 1 Posted December 29, 2009 Good info on how to do the wax thing, I fancy going down this route rather than using resin. Regarding the Molnija bridges, you just doing the Nighthawk thing or making them from scratch? 618 style perhaps... From scratch, 618. Great stuff, any idea on prices? No idea yet. The micro economics of CNC are happening in my office. The initial investment in tooling, learning, and setup are large. The cost of making a bridge or dial is insignificant, although with my setup they will happen one at a time and very slowly. There's no way with a little setup like mine it will be cheap, but much less than if I outsourced. Share this post Link to post Share on other sites
okabum 0 Posted January 2, 2010 I´m in, this plates can be fantastic. have you ever tought in replicate an angelus? Share this post Link to post Share on other sites
10:10 Watch Repair 1 Posted January 2, 2010 I´m in, this plates can be fantastic. have you ever tought in replicate an angelus? I don't have an Angeulus to work from. For the Molnija, I scanned the bridges and made a 1:1 cad file. At $20 / movement, it's easy to start with these. Dials are first to get to know the tools and then I'll work on bridges soon. Share this post Link to post Share on other sites
trailboss99 994 Posted January 3, 2010 Don't rush him fellas. cls is on a learning curve and they will be done when the're done. Good things come to those who wait. While you're all waiting, I happen to know that okabum has some real nice vintage hands for sale. Col. Share this post Link to post Share on other sites
10:10 Watch Repair 1 Posted January 3, 2010 Don't rush him fellas.cls is on a learning curve and they will be done when the're done. Good things come to those who wait. Col. True, Advantage RWG 1.1 members. I don't want to get into it with the RG vintage folks, so most of what I do stays here. Share this post Link to post Share on other sites