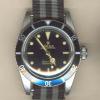
davylloyd 0 Posted August 5, 2012 Previously I started a thread on the forum called, quite amazingly, 6538 Bond project part one. This basically covered the stripping down of a cheap and cheerful ($85) 6538 rep, and got as far as the very beginning of working on the dial. I've started a new thread now, simply because of the length of part one, to save people wading through all of that stuff. This is where I left it last time, having scrubbed out and painted over the bottom two lines of text (not required). I've noticed on my reference pictures of the gen. that the remaining two lines should be lower down, but I can't do much about that. Share this post Link to post Share on other sites
davylloyd 0 Posted August 5, 2012 Because the dial is so flat and uninspiring, the plan is to colourise it a little, to bring it to life. On the gen., the dial is gilt (which we can't do) and the depth rating is silver (which we also can't do). Best I can think of is to use a graphite shading stick over the white ....to get this effect. Share this post Link to post Share on other sites
davylloyd 0 Posted August 5, 2012 Then to mix up some colour wash. I decided to use glass paint, well thinned down. The yellow just as it comes, then make a brown from red and green, then mix some of this with the yellow to get a kind of golden brown. Share this post Link to post Share on other sites
davylloyd 0 Posted August 5, 2012 ....then apply a thin even coat of this to the dial. Share this post Link to post Share on other sites
davylloyd 0 Posted August 5, 2012 Next I washed the brush, squeezed out the water, and used it to wick away the wash from the depth rating. Share this post Link to post Share on other sites
davylloyd 0 Posted August 5, 2012 While the dial is drying, I'll move on to the hands. This is where I left them last time - Share this post Link to post Share on other sites
davylloyd 0 Posted August 5, 2012 First step, mix the same colour as for the dial, but not quite so thin. Share this post Link to post Share on other sites
davylloyd 0 Posted August 5, 2012 Then apply a thin coat to the hands. Share this post Link to post Share on other sites
davylloyd 0 Posted August 5, 2012 In the meantime, the dial begins to dry. Share this post Link to post Share on other sites
davylloyd 0 Posted August 5, 2012 When it's fully dry, apply a layer of matte varnish to bring it all together, and protect what I've done so far. Share this post Link to post Share on other sites
davylloyd 0 Posted August 5, 2012 Working fairly quickly, get a thin, even layer of varnish on, and then leave it to dry. Compare this to the first pic. in this thread to see what's changed..... Share this post Link to post Share on other sites
davylloyd 0 Posted August 5, 2012 Remember, I'm not trying create something pristine and perfect here, more something that's fifty years old but well cared for. Share this post Link to post Share on other sites
davylloyd 0 Posted August 5, 2012 Time to move on to the bezel insert. Although this is appropriate to the 6538, on the Bond watch the bezel has no indices between 0 and 5, 5 and 10, and 10 and 15. The triangle around the pearl should also be silver. What I'm not going to attempt is correcting the font of the numbers, that would be beyond me. Here's our starting point - Share this post Link to post Share on other sites
nunu78 1,743 Posted August 5, 2012 Impressive as you have the courage to do something like that, for me even open a case back is a big thing. Share this post Link to post Share on other sites
davylloyd 0 Posted August 5, 2012 My first idea was to strip the red paint. I bought this stuff one time to remove some marker pen on a radiator, which it did with ease. Unfortunately, it also removed the radiator paint.....so it should be ideal for our purposes. Share this post Link to post Share on other sites
davylloyd 0 Posted August 5, 2012 So applied some and waited. Share this post Link to post Share on other sites
davylloyd 0 Posted August 5, 2012 But it did absolutely jack. They should paint tanks with this stuff - it's bombproof. Plan B is to paint the triangle silver, so first job is to mask it up. Must stop now for some chow. Back in a while. Share this post Link to post Share on other sites
DeLaForce 2 Posted August 5, 2012 Good pics, of you're steps I was surprised how resistant rep bezels are also.... Share this post Link to post Share on other sites
diegosaenz 0 Posted August 5, 2012 I'm really looking forward to see the final product, its looking great so far! Share this post Link to post Share on other sites
onionbag 1 Posted August 5, 2012 The reason why you can't 'strip' the bezel is that it's anodized Aluminium, the outer layer (oxidised Aluminium) is 'dyed'....permanently bonded and can only be removed by abrasion...............if I remember my chemistry classes correctly. Good stuff though mate. Share this post Link to post Share on other sites
davylloyd 0 Posted August 5, 2012 Thanks onionbag for that, anyhow it's definitely not paint, and like Stur, I'm impressed with Guangzhou for their efforts. Anyhow, onwards.... Share this post Link to post Share on other sites
davylloyd 0 Posted August 5, 2012 I decided to try some silver car paint, my eyes not being up to this sort of fine work, I'm using a loupe. Share this post Link to post Share on other sites
davylloyd 0 Posted August 5, 2012 ...carefully around the pearl with a very fine brush, keeping a daub of paint close to the work so that it's in my eyeline. Share this post Link to post Share on other sites
davylloyd 0 Posted August 5, 2012 If it doesn't look too good after some detail sanding and polishing, the graffiti remover will make a return. Share this post Link to post Share on other sites
davylloyd 0 Posted August 5, 2012 (edited) ....and so, on to the black. One of the mistakes I made on the triangle was not cutting a clean edge on the masking tape with a craft knife. The existing edge on the tape is too 'wooly' for this kind of detail. Perhaps masking fluid would work? Mental note to try that next time. Now to cut some small slivers of masking tape, and covering the batons and the '10', as well as masking off the areas that don't need changing. Edited August 5, 2012 by davylloyd Share this post Link to post Share on other sites