davylloyd 0 Posted August 5, 2012 ....so that we leave just the area of interest. Share this post Link to post Share on other sites
davylloyd 0 Posted August 5, 2012 OMG!, what have I done! Mustn't panic, I can always strip the paint off and go back to the original 'anodised' finish (thanks again, onionbag). Share this post Link to post Share on other sites
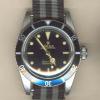
davylloyd 0 Posted August 5, 2012 ....O.K., panic over, this is how it wound up. Share this post Link to post Share on other sites
davylloyd 0 Posted August 5, 2012 And after some cleaning-up with a cocktail stick and some acetone, I'm left with this - Share this post Link to post Share on other sites
KeNnY 29 Posted August 5, 2012 WOW !!! Amazing how you made the bezel insert ! LOOKS GREAT ! Share this post Link to post Share on other sites
davylloyd 0 Posted August 5, 2012 Next time, I'll get to work with some very fine wet and dry paper, and try burnishing the silver triangle with some pithwood and then polishing it all up. For now, I'll declare myself happy with the dial, happy with the black part of the insert, and thinking about how to improve or change the triangle. .... and I'll look forward to your company when I start to tackle the case and caseback. Share this post Link to post Share on other sites
onionbag 1 Posted August 5, 2012 How's the blend between your sprayed black and the original finish? Do you think the painted surface will be prone to scratching/flaking? Yes some fine wet and dry will be the way to go, and possibly finish with aluminium polish?......Nah it'd be too shiny, just a burnish methinks. Share this post Link to post Share on other sites
davylloyd 0 Posted August 5, 2012 The blend between the new and existing black is fine, and I know from using this paint previously that it bonds really well, even without primer. I may have hit on a method for drilling out the lug holes to 1.25mm, to take the larger Rolex type spring pins. My work takes me into dentists, and the high speed handpieces they use spin up to 40,000 rpm and have built-in water spray. They drill through the enamel of your teeth, and surgical steel posts, with consummate ease, so 4 or 5mm of 316 stainless should be child's play. I'll chat to some dentists tomorrow. Share this post Link to post Share on other sites
davylloyd 0 Posted August 5, 2012 WOW !!! Amazing how you made the bezel insert ! LOOKS GREAT ! Having seen your work for the first time on the Franken rep. for GWT, you must be pissing yourself at my pathetic efforts. Not to make you blush, but people with your level of skill inspire me. Share this post Link to post Share on other sites
YoungGPS 0 Posted August 6, 2012 Anticipation is growing for the next part! Share this post Link to post Share on other sites
davylloyd 0 Posted August 7, 2012 I've abandoned the idea of drilling the lug holes using a dentist's drill. I have to go up to my company's workshop today, so I'll make use of their pillar drill and get both cases done. I'll take some pics and post them next time. Share this post Link to post Share on other sites
baxter 6 Posted August 7, 2012 Top effort Davy ................................. do hurry up with part 3 old boy Share this post Link to post Share on other sites
SB56667 155 Posted August 7, 2012 Man, admirable invention and persistence! Thanks for the steps and the pics, and keep them coming! Share this post Link to post Share on other sites
Rav747 0 Posted August 7, 2012 holy crap! this is awesome. great work bud! cant wait for all this to come together. Share this post Link to post Share on other sites
fatarms 7,777 Posted August 7, 2012 This is pure, 100% awesome right here. Share this post Link to post Share on other sites
davylloyd 0 Posted August 7, 2012 (edited) Well, a day of triumph and despair. The despair? Despite having access to a decent pillar drill and some brand new TCT drills, the drilling out of the lug holes was more difficult than I imagined. I didn't realise 316 was so hard! A good pal of mine, a mechanical engineer, has made some suggestions. 1. I was probably drilling at too high a speed, and despite using a cutting lubricant, probably just took the cutting edge off the drill bits, and then 'cooked' and hardened the steel. 2. To remedy these half-drilled holes, get a diamond-tipped drill bit and drill at a slower speed. 3. Get some Cobalt steel drill bits to drill the new (untouched) holes. So these have been ordered and I will try them soon. More despair? The bezel insert didn't map out as I had hoped, The bonding of the paint wasn't good, and the whole thing just didn't look right. The triumphs? Well I set about the bezel with fine wet and dry paper and bleach, and ended up with a result I'm really pleased with. I'm going to put up with the bezel being slightly wrong for the Bond watch and settle for it looking older and more 'right'. Secondly, I mixed up some lume that mimics the aged Tritium pretty well, if I say so myself. Had my first go at reluming a dial and hands, and all things considered, I'm pretty happy with the outcome. Apologies for there being no pics, but I haven't yet sorted an indoor photo set-up, light tent and so on. I'll post some pics of what I've done when I get time and there's some daylght. Oh, and I've also 'aged' the case and back with varying grades of wet and dry. Edited August 7, 2012 by davylloyd Share this post Link to post Share on other sites
DeLaForce 2 Posted August 7, 2012 I feel you're pain on drilling out lug holes lol Share this post Link to post Share on other sites
davylloyd 0 Posted August 9, 2012 This afternoon was a much more successful session, and I've now completed the first watch in the project. I've started a new thread, 6538 Bond project completion. Share this post Link to post Share on other sites