Ska 11 Posted May 26, 2010 Hi all, In anticipation of the arrival of my UPO I've done a bit of photography practice. Wanted to see what you experts thought. Made a light tent in a corner of my workshop. The camera's nothing special just a Nikon D40 with standard 18-55 lens shooting RAWs. Got Photoshop CS4 for touching up etc. Ok so having made this away from home - on a bit of a whim - I have no nice watches about so I found an old Storm I got when I was like 18 and borrowed a crappy non-chrono with fake subdials from one of my technicians at the workshop. here are the results with the old Storm: http://img248.imageshack.us/img248/2931/storm9.jpg http://img709.imageshack.us/img709/5530/storm8.jpg http://img15.imageshack.us/img15/5882/storm7.jpg http://img80.imageshack.us/img80/6995/storm5.jpg http://img72.imageshack.us/img72/9700/storm4.jpg Share this post Link to post Share on other sites
Ska 11 Posted May 26, 2010 (edited) This time I'll actually include the damn pitchers!!!! Edited May 26, 2010 by skathewatch Share this post Link to post Share on other sites
dingle 57 Posted May 26, 2010 looks good, but scale the picture size down so that it fits the board Share this post Link to post Share on other sites
Ska 11 Posted May 26, 2010 (edited) Ok now the Crappy Chrono...... Let me know what you guys think..... Edited May 26, 2010 by skathewatch Share this post Link to post Share on other sites
Ska 11 Posted May 26, 2010 yeah I was just thinking that - how do I do it?? Share this post Link to post Share on other sites
dingle 57 Posted May 26, 2010 yeah I was just thinking that - how do I do it?? you will need to do it in image shack for these pics... If it is a new pic, you can do it on your camera Share this post Link to post Share on other sites
Omeg@007 0 Posted May 26, 2010 This is an ICU chamber Share this post Link to post Share on other sites
Ska 11 Posted May 26, 2010 OK Images resized ....... Phew Share this post Link to post Share on other sites
dingle 57 Posted May 26, 2010 OK Images resized ....... Phew perfect! Share this post Link to post Share on other sites
GC 4,517 Posted May 27, 2010 I'm no expert but IMO you are off to a fantastic start!!! The first set of pics are very nice a sharp and well lit too! Bravo... looking forward to the pics of your coming UPO Share this post Link to post Share on other sites
Ska 11 Posted May 27, 2010 Thanks man! Coming from you that means a lot!! Just ordered a black backdrop curtain, 2 Acrylic Risers (black and White) for shooting reflections and a couple of watch stands. Any tips for getting good results with a black background?? Are you and SS going to do that photo comp?? Share this post Link to post Share on other sites
GC 4,517 Posted May 27, 2010 Thanks man! Coming from you that means a lot!! Just ordered a black backdrop curtain, 2 Acrylic Risers (black and White) for shooting reflections and a couple of watch stands. Any tips for getting good results with a black background?? Are you and SS going to do that photo comp?? Hmmm...tips for the blk background...lighting is key! But generally, you have to practice and just play around and see what your camera is capable of. Right off the bat I can tell you your camera can do more than mine, I use a point and shoot Canon that was very inexpensive (circa $150). So from the get go you already have an advantage with settings and the sensor being of better quality. So again the key is just have fun and play around with settings, practice with lighting, angles and shadows. Forget about getting "the shot" for a while. Take notes for yourself, writing down what settings you are using and which shot it corresponds to. Later when you process them you can see what results you like and can use those setting in the future. That is how I learned what my camera was capable of and it limitations also. In truth, I probably learned the hard way, because I'm not good at theory and reading endless manuals and books. There are six things that really make "the shot", the first three are: subject, lighting & you. The second three are: practice, practice and more practice. Share this post Link to post Share on other sites
Ska 11 Posted May 27, 2010 Seriously - Thanks! Great advice. Time to get practicing.......One day like you I shall be a photo ninja...... Share this post Link to post Share on other sites
Ska 11 Posted May 27, 2010 Right - going by the "practice makes perfect" ideal here are my first group of photos taken with a black background. Just stuck some black fabric to a board and used it as a back stop, then found an old bit of shiny black plastic and used that as a base. Here goes: I think they turned out ok, need to get a small directional lamp to brighten the face a bit.... Share this post Link to post Share on other sites
houndoggie 58 Posted May 27, 2010 Looking good.. I like both the stark white and the black backgrounds myself. My examples: This one taken in my light box This one taken in the dark with a bounced flash Canon Rebel XT I do some tweaking in Picasa to make everything pop more. Share this post Link to post Share on other sites
Ska 11 Posted May 27, 2010 they're beautiful, how do you get the really stark black and white? is it all done with colour balance etc afterwards? Share this post Link to post Share on other sites
Silverspeed 10 Posted May 27, 2010 You're of to a great start Skate As long as you got the lighting part sotred out, which you do, and the focussing it will only need a few tweeks to make the pic really pop out. 9 out of 10 times just add a bit more contrast and some sharpening and you're good This one is on a black underground in a lightbox, contrast and sharpness a bit tweeked and converted to sephia colours Share this post Link to post Share on other sites
houndoggie 58 Posted May 27, 2010 they're beautiful, how do you get the really stark black and white? is it all done with colour balance etc afterwards? Yep... I usually increase the highlights on the stark white until it looks like that. The black is also a little increase in highlights, a little increase in shadows, then a trick.. focal black and white just leaving the orange second hand tip in color, then I slightly blue tinted the whole picture. Share this post Link to post Share on other sites
Ska 11 Posted May 27, 2010 Brilliant advice guys, I really appreciate it. Adjusted this photo of the Crappy Chrono accordingly. Reduced the saturation, focal grascale, Increased both highlights and black and then boosted the white balance. Much better I think, seriously thanks for taking the time to help me!! Share this post Link to post Share on other sites
AllergyDoc 40 Posted May 27, 2010 Nice job. No need to make excuses for the "cheapie" Nikon D40. I bought my wife one years ago and it takes better pics that my more expensive D80. The colors that come out of her camera are amazing, especially skin tones. Share this post Link to post Share on other sites
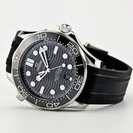
Ska 11 Posted June 4, 2010 Hey again guys Some of these photos (in their basic form) are up on the review of my UPO but I've since taken Curcio and Silverspeed's valuable advice about shadows/reflections etc and touched them up a little on Photoshop. I've also added some correct genuine Omega logos to lend the photos some added 'authenticity'. Share this post Link to post Share on other sites
Luto 0 Posted June 4, 2010 Hey again guys Some of these photos (in their basic form) are up on the review of my UPO but I've since taken Curcio and Silverspeed's valuable advice about shadows/reflections etc and touched them up a little on Photoshop. I've also added some correct genuine Omega logos to lend the photos some added 'authenticity'. the best composition i think. just a little overblown on the lower right lug. Share this post Link to post Share on other sites
Ska 11 Posted June 4, 2010 yeah that was annoying - I'm using big flourescent lamps (because they're all I have) and it was a trade-off of not enough light for the photo/huge reflection in the crystal/or glare on the lug. The lug came out on bottom.... Share this post Link to post Share on other sites
AllergyDoc 40 Posted June 4, 2010 Nice job! Do you do any sharpening? Images look a little soft. Share this post Link to post Share on other sites