Duzza 182 Posted February 9, 2015 So today I embarked on something of frightening prospect, I took the bezel off my BK DSSD and started to look at upgrading it. Firstly I pryed the bezel up and off the watch, there's plenty of tutorials here on how to do this. It is surprisingly straightforward. I had order a replacement pearl from ebay here http://www.ebay.co.uk/itm/201275903871?_trksid=p2059210.m2749.l2649&ssPageName=STRK%3AMEBIDX%3AIT and figured I might as well paint the bezel numbers and triangle since I had the pearl out. I applied some heat from a hair dryer and the insert was very easy to remove from the retaining ring. My DSSD is a BK but it has also been to see KeNnY so it had his remodelled pearl already. I heated up the pearl from the rear and it cam out pretty easily. BANG first issue! The Noob pearl has little more than a pin sized notch to hold it in place. Meaning the hole in the bezel is tiny. My new pearl is erm somewhat bigger! So need to make that hole in the ceramic a hell of a lot bigger. I can tell you I nearly gave up at the point for fear of cracking the ceramic insert. However I persevered and got the trusty dremel out with a micro diamond grinding bit I didn't know I had. Pretty scary at this point as these things are well known to break even just by pulling them out of the retaining ring. All went well though and I carefully kept removing a small amount of material at a time until the hole was just large enough to accept the pearl. As you can see the required hole is pretty large! And test fit the pearl The heat from the diamond bit had burned the paint but this wasn't an issue as I was intending to remove it all from the triangle anyway as it was already quite uneven. So I started with some thinners and a toothpick and removed all the existing white paint in the triangle. Took some time but eventually got it cleaned up and a fresh coat of white on it. So far so good! So next up was to make a mix for the platinum. I settled on a mix of Vallejo acrylics, namely Metal Medium and Natural Steel. This was the best I could come up with over a few days of tests and reflects the light with a nice silver hue but face on looks almost white. Both components have a nice amount of metallic fleck which gives a good range of colours coming off in different lights. and applied to the bezel. So an overnight dry and ill update tomorrow or Wednesday with further progress. Left to do: - Remove excess platinum paint - Apply dull cost to protect the acrylic - Remove excess dull coat - Mount pearl and glue - Reattached Bezel assembly Thanks for looking! Share this post Link to post Share on other sites
Chiruku 25 Posted February 9, 2015 Braver man than me! Especially on a BK :o Good luck with it mate. Share this post Link to post Share on other sites
GenTLe 1,509 Posted February 9, 2015 Looks really promising Duzza! Well done!! Share this post Link to post Share on other sites
Irishcain 0 Posted February 9, 2015 Well done Duzza. Looking forward to seeing the end product. Share this post Link to post Share on other sites
Duzza 182 Posted February 9, 2015 Difficult to photograph but heres my BLNR with the same paint mix Share this post Link to post Share on other sites
Wrist-Time 0 Posted February 10, 2015 I'm watching with interest here, as I lost the pearl from my DSSD. Got another pearl from HK , but like you it's bigger than the hole. I've never got around to inserting it, because I read to get the bezel out you had to take the crystal out first. Think it was in one of kennys videos. Anyway, good luck with the project. Hope it all goes well for you. I may try it myself. Share this post Link to post Share on other sites
Seand83 0 Posted February 10, 2015 you my friend have balls of steel. Very brave. God job Share this post Link to post Share on other sites
JDM180 7 Posted February 10, 2015 Ive got the same pearl to put on an old DSSD myself so good to read this ! Thanks for posting Share this post Link to post Share on other sites
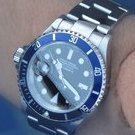
Duzza 182 Posted February 11, 2015 and on to part 2. The remaining platinum paint was removed. Now I used 2 methods here which may or may not help other in the future. I removed the excess with a small amount of thinner on a cottonwool q-tip. This works well if you are careful, once you get the hang of it you can be very accurate and avoid disturbing paint inside the bezel engraving. This isnt meant to remove all the excess paint just the majority. I then allowed the thinner on the bezel to dry and went about removing paint accurately with a toothpick (cocktail stick). the worked well for me. The same process was used to removed the dried dull coat (Testors applied neat, no thinning) once I had applied that and allowed it to dry. This just meant I was ready to mount the pearl which I did on a bed of 2 part epoxy. Once that had dried I set about lining up the pearl to 12 o'clock by remounting the bezel assembly to the watch and testing where best to place the insert. Once I had decided on the best alignment I made up some more 2 part epoxy and put 8-12 dots around the retaining ring and mounted the insert. Then left to dry. Final results!! I'm pretty pleased! Share this post Link to post Share on other sites
Seand83 0 Posted February 11, 2015 You did a superb job. Looks great. Share this post Link to post Share on other sites
Genius 281 Posted February 11, 2015 I'm pretty pleased! I would be too, great job! Share this post Link to post Share on other sites
deadmeat 0 Posted February 11, 2015 Info is right-on-time as I'm getting ready to treat my DSSD to the same. Great job, fine work man. Share this post Link to post Share on other sites
BenjaminB 0 Posted February 11, 2015 looks great but not something I would try myself - does Kenny do this kind of bezel mod? Share this post Link to post Share on other sites
GenTLe 1,509 Posted February 11, 2015 Very well done mate!!! Share this post Link to post Share on other sites
Irishcain 0 Posted February 11, 2015 Terrifically done! Share this post Link to post Share on other sites
Wrist-Time 0 Posted February 11, 2015 Great job there. I maybe try that myself, once I work up the courage. What did you pop the bezel off with? Share this post Link to post Share on other sites
Duzza 182 Posted February 11, 2015 Great job there. I maybe try that myself, once I work up the courage. What did you pop the bezel off with? Anything thin, strong and blunt will work to pry it off. I used a tool I found in my cheap watchmakers tool set. A little stubby blunt bladed thing. Share this post Link to post Share on other sites
Wrist-Time 0 Posted February 12, 2015 Thanks. I'll give it a go.. I think Share this post Link to post Share on other sites
Stuvetjee 17 Posted February 12, 2015 and on to part 2. The remaining platinum paint was removed. Now I used 2 methods here which may or may not help other in the future. I removed the excess with a small amount of thinner on a cottonwool q-tip. This works well if you are careful, once you get the hang of it you can be very accurate and avoid disturbing paint inside the bezel engraving. This isnt meant to remove all the excess paint just the majority. I then allowed the thinner on the bezel to dry and went about removing paint accurately with a toothpick (cocktail stick). the worked well for me. The same process was used to removed the dried dull coat (Testors applied neat, no thinning) once I had applied that and allowed it to dry. This just meant I was ready to mount the pearl which I did on a bed of 2 part epoxy. Once that had dried I set about lining up the pearl to 12 o'clock by remounting the bezel assembly to the watch and testing where best to place the insert. Once I had decided on the best alignment I made up some more 2 part epoxy and put 8-12 dots around the retaining ring and mounted the insert. Then left to dry. Final results!! I'm pretty pleased! Looks the bomb mate! A bit greyish/white from a distance and silver upon close like the gen! Well done! Share this post Link to post Share on other sites
kennycoder 97 Posted February 12, 2015 I just made me consider doing this to my hulk sub. Share this post Link to post Share on other sites
Duzza 182 Posted February 13, 2015 Thanks for all the kind words Share this post Link to post Share on other sites
ShovelnTC 31 Posted February 13, 2015 Great work mate, It's nerve racking pulling things apart but great when your project goes to plan. Enjoy the rewards of your efforts. Share this post Link to post Share on other sites
Duzza 182 Posted February 17, 2015 So almost a week in and a trip to my local AD later I am very pleased with the colour of this paint. Having bought the Testors paint that is recommended elsewhere very often I believe my mix is more true to the genuine Rolex platinum colour. Its also more widely available (in the UK at least) than Testors paints For anyone thinking of doing this mod I highly recommend this mix: Vallejo Metal Medium (2 drops) Vallejo Natural steel (a very small amount from the end of a toothpick until you achieve the platinum hue) Airbrush thinner (1 drop) Ensure you re-mix every 30 seconds or so. Once dry, recommend 2 days. Seal with Testors dullcoat, either straight or let down very slightly with a lacquer thinner. Share this post Link to post Share on other sites